Only administrators have access to view and edit the practice settings. Changes to these settings will set the default for all users within the practice. (Individual users will still be able to change their user specific settings.) Navigate to Practice Settings
- Login to ScriptSure.
- Click your name in the top right hand corner and click on "Manage Users & Practices".

- On this screen, you'll find the "Create New Practice" button, or to edit an existing practice click the "View" button right across that specific practice.

- When you click the "Create New Practice" button, you'll be directed to the page below. Here, you can effortlessly add the practice's name, address, phone, fax, and other tax-related information. You may also add a Facility NPI number on this page:

- As you scroll down, you'll come across the "Bamboo PMP Gateway Credentials" section. This is where you can input your PMP Credentials. Once you've made all the necessary adjustments, simply hit "SAVE" to create the practice and ensure your changes are securely stored:

- On the flip side, clicking the "VIEW" buttons next to each practice on the selection page will take you directly to the Practice settings interface.

- As soon as you land on the PRACTICE page, you'll spot the prominent buttons: "Practice Settings," "EPCS Approval," "Inactivate Practice," "Reports," and "EDIT."

Practice Settings
Click the "Practice Settings" button and you'll be directed to this page:
Restore Practice Defaults
- Click this option only if you would like to reset all Practice Settings to the default settings.

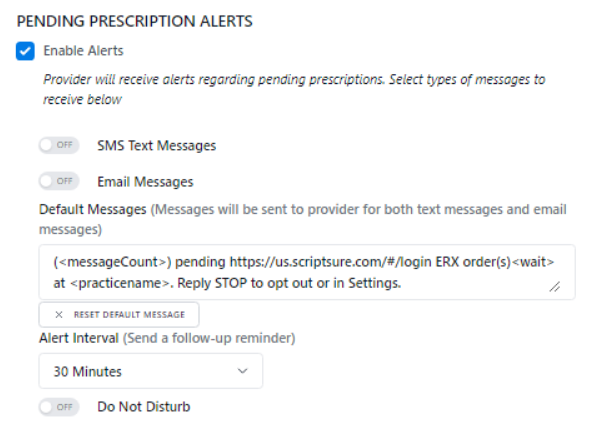
Pending Prescription Alerts:
On the same screen, you'll see "Pending Prescription Alerts" where you can:
- Slide the toggles to the right to activate SMS or Email Notifications for all providers within the practice.
- Customize a Default Message that providers will receive, ensuring it contains all necessary information.
- Alert Interval allows you to set intervals between follow-up reminders.
- Do not Disturb allows for an admin to set a do not disturb Start and End period. During the do not disturb period, the providers will not receive SMS text or email messages regarding the pending prescription alerts.
Notifications and Alerts
Administrators have the flexibility to edit or activate notifications for specific checks and precautions listed below.
Toggle the corresponding switch to activate or deactivate the notification/alert as per your preference:
Patient Allergy Check: Receive alerts regarding patient allergies to prevent adverse reactions.
Drug to Drug Interaction Check: Stay informed about potential interactions between prescribed medications.
Drug Tolerance Level: Receive notifications related to drug tolerance levels for accurate dosage management.
Drug to Food Interaction Check: Be alerted about possible interactions between drugs and food items.
Polypharmacy Check: Monitor and manage cases involving multiple medications to avoid complications.
Duplicate Therapy Check: Get alerts regarding duplicate therapies to ensure optimal treatment plans.
Additive Side Effect Check: Receive notifications about additive side effects of medications.
Additive Side Effect to Condition: Stay informed about potential side effects related to specific patient conditions.
Drug to Disease Condition Check: Be alerted about drug interactions concerning specific disease conditions.
Geriatric Precaution: Receive notifications regarding precautions for geriatric patients.
Lactation Precaution: Stay informed about medication precautions for lactating patients.
Pediatric Precaution: Receive alerts related to medication precautions for pediatric patients.
Pregnancy Precaution: Be alerted about medication precautions for pregnant patients.
Patient Drug Comment Check: Stay informed about any specific drug-related comments for patients.
Warn No Diagnosis Entered: Receive warnings if no diagnosis is entered for a patient.
Warn No Allergy Entered: Be alerted if no allergy information is entered for a patient.
Opioid Limits (Duration check for patients under age of 18): Receive alerts related to opioid duration limits for patients under 18 years old.
Opioid Limits (Duration check for patients over age of 18): Be alerted about opioid duration limits for patients over 18 years old.

Advanced Practice Settings
General Settings:
- Chart ID/MRN:
- Definition: This setting allows users to define the format for displaying patient Chart ID or Medical Record Number (MRN).
- Permissions:
- Definition: Users can set permissions to enable all supporting users to prescribe for all providers within the practice.
- Prescription Layout:
- Definition: Customize the prescription layout for printing on 8 1/2 x 11 paper to enhance compatibility and readability.
- Session Timeout:
- Definition: Set the duration after which inactive sessions will automatically log out to ensure security and privacy.

- Definition: Set the duration after which inactive sessions will automatically log out to ensure security and privacy.
Prescription Settings:
Chronic Selection on Prescription:
- Definition: Enable or disable the chronic selection feature on prescriptions for streamlined medication management.
Require Insurance on Prescription:
- Definition: Specify whether insurance information is mandatory on prescriptions.
Require Diagnosis on Prescription:
- Definition: Determine whether a diagnosis is mandatory when issuing prescriptions.
Change Request Time Lapse:
- Definition: Set the allowable timeframe for sending change requests.
Delivered Formats on Medication Dropdown:
- Definition: Customize the display format for medication options in dropdown menus.
Add Days to the Expiration Date:
- Definition: Extend the expiration date of prescriptions by adding extra days.

- Definition: Extend the expiration date of prescriptions by adding extra days.
Pharmacy Settings:
In-House Pharmacy:
- Definition: Indicate whether the practice has an in-house pharmacy.
Save Practice Pharmacies to Favorite List Automatically:
- Definition: Automatically save practice pharmacies to the favorite list for convenient access.
Save Pharmacies from Drug History Download to Patient Chart:
- Definition: Choose to save pharmacies from drug history downloads directly to patient charts.
Show Practice Frequently Used Pharmacy List:
- Definition: Display the list of frequently used pharmacies for quick selection during prescribing.

- Definition: Display the list of frequently used pharmacies for quick selection during prescribing.
Electronic Prescriptions:
Patient Eligibility Requests:
- Definition: Enable or disable the option to request patient eligibility information electronically.
Formulary Search:
- Definition: Enable formulary search functionality to check medication coverage and formulary status.
Download Drug History:
- Definition: Enable or disable the automatic download of drug history for patient charts.
Show Drug History Confirmation:
- Definition: Choose whether to display a confirmation message when downloading drug history.

- Definition: Choose whether to display a confirmation message when downloading drug history.
EPCS Approvals
Another button from the Practice page is the "EPCS Approvals" button:
 Once you click this button you will see the "EPCS Approvals" page where you can track pending, approved and denied EPCS requests:

Inactivate Practice
Click the "Inactivate Practice" button and a prompt confirming the inactivation of the account will appear. Click "YES" then save the change.

Reports
Clicking the "Reports" button will help you track the Practice's Activity Log.

After clicking "Practice Activity Log," you'll transition to the "Audit Log" page.

EDIT Practice
From the Practice page click the "EDIT" button and you'll be directed to the "Update Practice" interface. Here, you can effortlessly tweak the practice's name, address, phone, fax, and other tax-related information. You may also add a Facility NPI number on this page:

As you scroll down, you'll come across the "Bamboo PMP Gateway Credentials" section. This is where you can input your PMP Credentials. Once you've made all the necessary adjustments, simply hit "SAVE" to create the practice and ensure your changes are securely stored:
On the Practice page, you'll see " Manage Existing Users" click this button and you'll be directed to a window with a list of users under the practice.


On the same section you'll see a gear icon which will give you these options to "Export User List", "Export Full User List", "Register All Providers" and "Setup User Roles" below:
1. Add Users: On the "Practice" screen scroll down and on the right part is the "Add User" button which allows you to add users to the practice. First, click "Add User".

Click "Invite New Provider to ScriptSure" to add a prescriber in or click on "Invite New Supporting User to ScriptSure" to add a staff or an adminstrator for the account.

Was this article helpful?
That’s Great!
Thank you for your feedback
Sorry! We couldn't be helpful
Thank you for your feedback
Feedback sent
We appreciate your effort and will try to fix the article