ScriptSure ERX Partner Provider Setup Guide
Introduction
The purpose of this guide is to help healthcare providers get started with ScriptSure setup. Setup is a ONE-TIME process that should take about 5-10 minutes to complete and includes provider identity verification.
Why Identity Verification?
Providers are required to perform Identity verification to be compliant with DEA regulations for electronic prescriptions for controlled substances (EPCS). It is important that providers perform their own identity verification.
Daw Systems has partnered with ID.me for the identity verification process. ID.me’s DEA-compliant identity verification allows healthcare providers to verify their identity one-time and create credentials they can use to securely issue electronic prescriptions for controlled substances from ScriptSure.
Once a provider has verified their identity with ID.me, that person will never have to re-verify their identity again across any organization where ID.me is integrated.
ID.me is a trusted digital identity network and is the first credential service provider in the United States to become certified to NIST 800-63-3. ID.me serves over 300 organizations including healthcare systems, government agencies, financial institutions, and nonprofits.
What You’ll Need
Before getting started, providers should have on-hand: an email account they have access to, a smartphone or tablet, and a government-issued photo ID. Providers will be asked to enter their Social Security number.
Have Questions? Need Help?
Troubleshooting Tips are on the last page of this document. Contact support@dawsystems.com or 866-755-1500 x2 with any questions or issues during setup.
IMPORTANT NOTE: YOU CAN ONLY HAVE ONE ID.ME ACCOUNT. IF YOU HAVE HAD AN ID.ME ACOUNT BEFORE, YOU WILL NEED TO USE THAT ACCOUNT TO START THE ID.ME PROCESS.
STEP 1: *Important* Pick your browser
Use GOOGLE CHROME or APPLE SAFARI web browser when signing up. You may encounter issues with advancing through screens if you do not use one of these browsers.
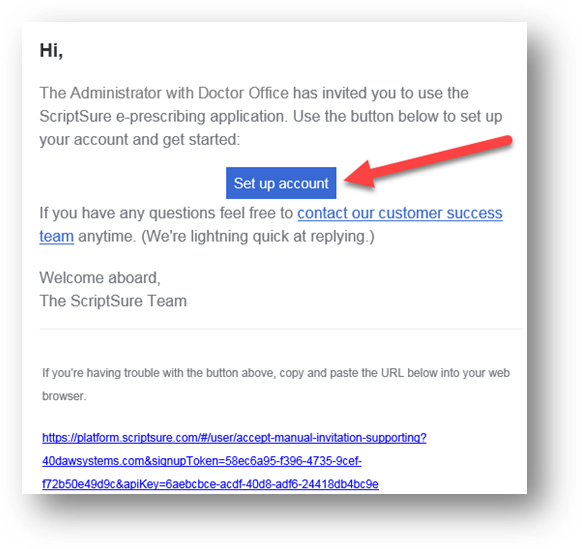
STEP 2: Find your Email Invite.
Check your inbox for an email titled INVITE TO SCRIPTSURE from accounts@dawsystems.com or your EHR company. Be sure to check JUNK/SPAM/OTHER folders within your email.
STEP 3: Click Set up account button in your email
NOTE: If a new browser window opens when you click the Set up account button, ensure you remain in Google Chrome or Apple Safari. If the new window opens in a different browser, copy the URL (website address) into Google Chrome or Apple Safari before you proceed.
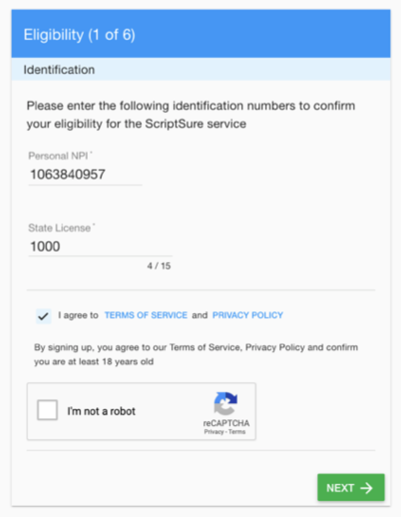
STEP 3-(1): Begin the Eligibility Steps
Begin by entering in your personal NPI (do not use an institutional NPI or anyone’s but your own). Also enter your State Medical License number. Check I agree to terms and the reCaptcha box and click Next.
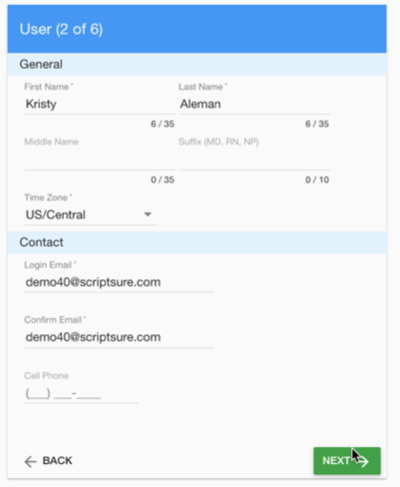
Step 3-(2): Enter Name and email information (and other optional information as desired) and click Next
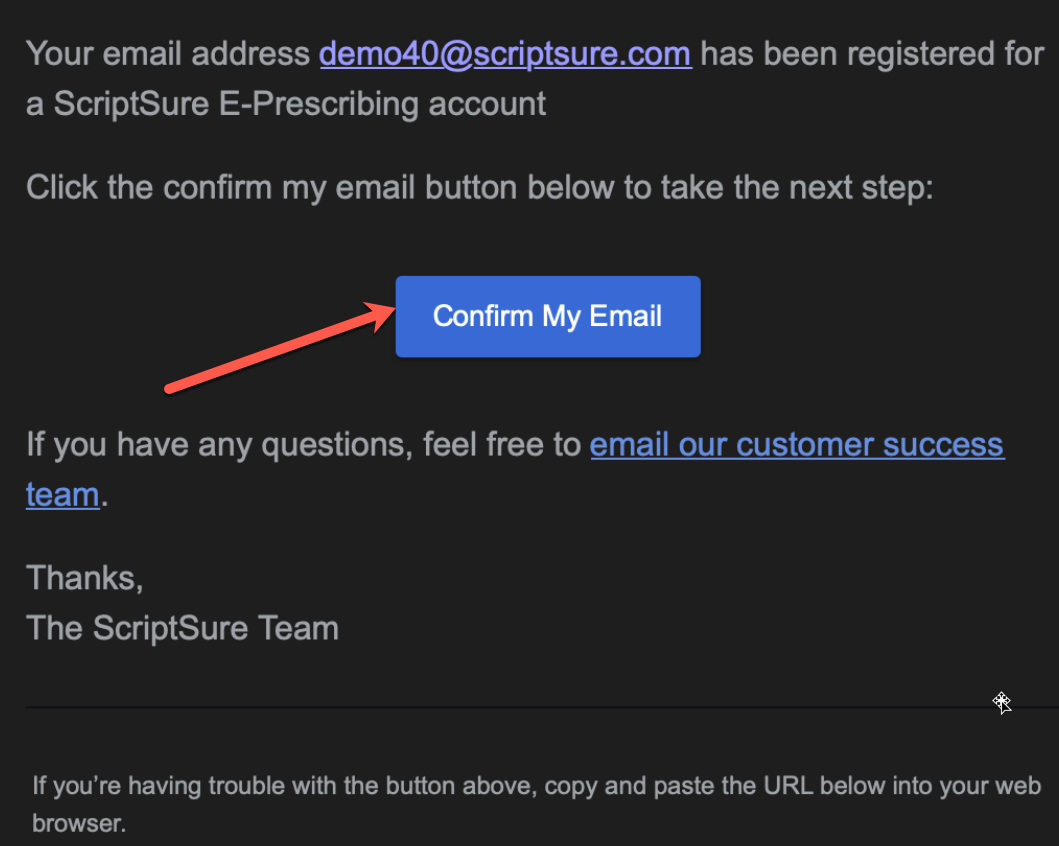
Step 3-(3): Go to your email and confirm your email
Step 3-(4): Create and Confirm a Password to Access ScriptSure

Step 3-(5): Confirm your NPI and DEA & enter any other credentials desired:

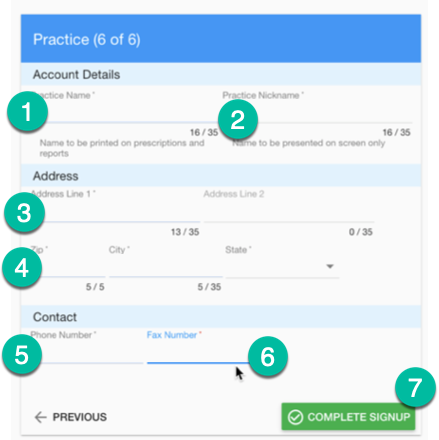
Step 3-(6): Enter the Account details and Click Complete Signup
This includes the practice/account name and practice nickname (this can be the same as the practice name or shortened to show smaller on screen. The practice/account full address, phone number and fax number.
Note: this is the information for your practice location and will transmit to the pharmacy and function as the header of the prescriptions.
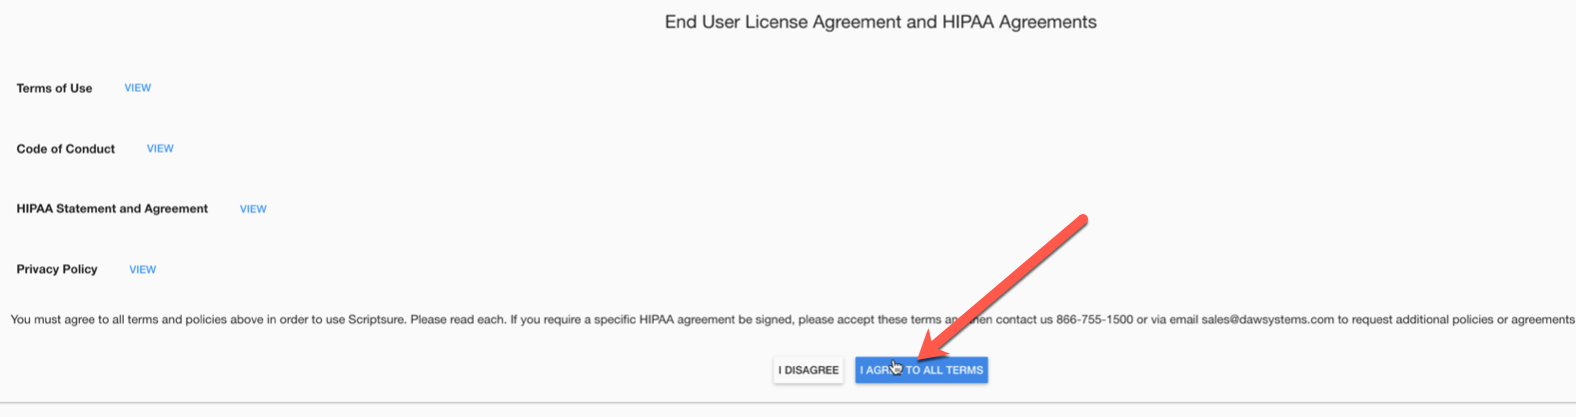
Step 3-(7): Accept the EULA Terms and HIPAA Agreements
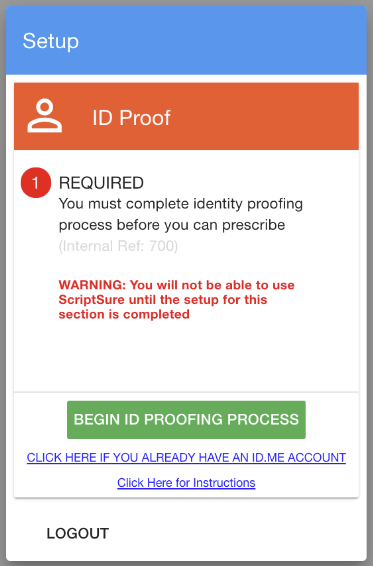
Step 3-(8): You will now be in ScriptSure and the application will show any required steps that must be completed. The first is ID proofing. Each provider must complete this in order to continue. Click the Already Have an ID.me Account or Begin ID proofing Process to create one.
(NOTE: You can only have one Identity proofed ID.me account; if you have ID.me, even if you used that with a different application provider, you should use that to login to ID.me. You can always associate a new email address to that account from within the ID.me profile.
If you have other required items to complete they will be indicated on-screen. Below are examples of additional items you may need to perform:

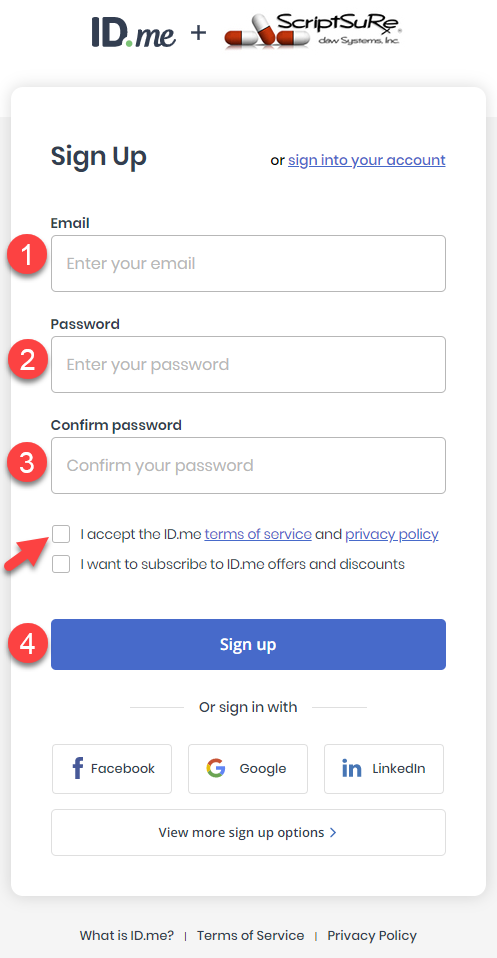
STEP 4: Create an account (or Sign In) with ID.me
When you click “Setup Account”, you will be brought to ID.me’s Sign up (or Sign in) page.
IMPORTANT: If you already have an ID.me account, simply Sign in to your existing ID.me account.
Create an account by signing up. Enter an email you have access to, set a password, accepting the terms of service and then, select Sign Up.
NOTE: If you have an existing ID.me account, DO NOT create a new ID.me account. Don’t worry, you will be able to link your existing ID.me account to Daw Systems / ScriptSure.
STEP 5: Confirm your email
Confirm your email address by logging in to the email used to sign up for ID.me and click the Confirm your email button. Follow the on-screen prompts (shown below) if you have any issues finding or confirming your email.
NOTE: If you signed in to your existing ID.me account, you will not be required to perform email confirmation.


A new browser tab will open to notify ‘Your email has been confirmed!’

NOTE: YOU MAY NOW CLOSE THIS CONFIRMATION TAB. To continue verification with ID.me, navigate to the tab in your browser you were working in originally to continue (see red arrow above pointing to the other tab).
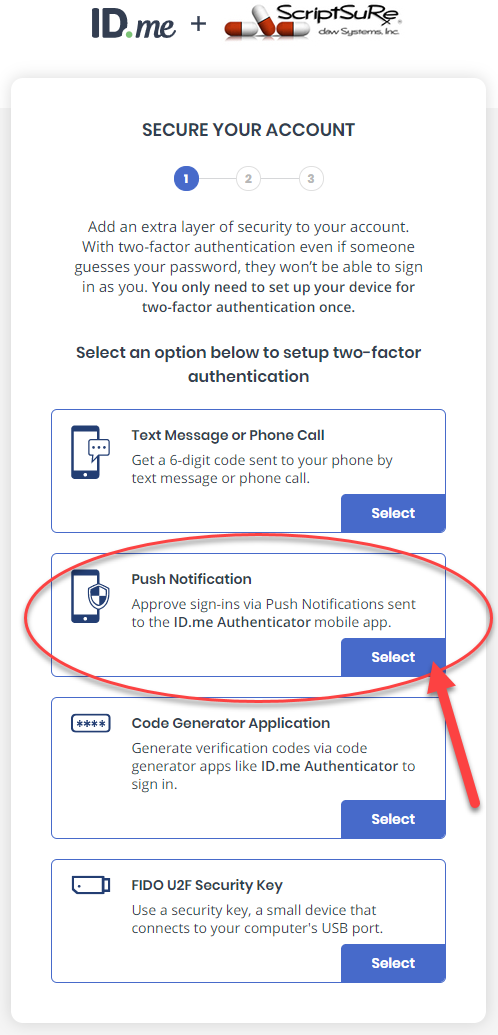
Step 6: Secure your Account
Secure your ID.me account with multi-factor or two-factor authentication (MFA/2FA). Multi-factor authentication adds an additional layer of security to your account by associating something that you have to your account. For future ID.me logins (and for e-prescribing from within ScriptSure), you will authenticate with the MFA/2FA method and/or device you setup in this step. Be sure to use a device you plan to have on your person when e-prescribing.
NOTE: ScriptSure recommends Push Notifications. Push Notifications appear as a banner on your device upon sign in that you simply tap or ‘push’ to authenticate yourself and authorize your event and is a very swift authentication method. You may also choose from the other methods listed.
Step 7: Choose app download method
If you choose Push Notification or Code Generator, you will be prompted to download the ID.me Authenticator app on your smartphone or tablet. Follow the on-screen and on-device prompts to download the app. If you choose FIDO key, follow the on-screen prompts for setup.
NOTE: If you are planning to use your smartphone as your authentication device, choose Text Message to receive the download link and enter the phone number of the smartphone you will use. If you are planning to use a tablet device, choose to receive the download link via email.

STEP 8: Complete ID.me Authenticator app setup
Follow desktop and smart device prompts to download and configure the ID.me Authenticator.
You will receive a text message or email with a link to download the ID.me Authenticator app. Open your text messages/email and click the link to get started with app download. Follow on-device prompts to complete setup. Be sure to click or tap on the green “Yes” to complete your setup (if you chose to set up Push Notifications).
NOTE: If you chose to set up a FIDO key, follow on-screen prompts to complete setup.


After downloading the app and completing your MFA/2FA set up, you will be notified that “YOUR ACCOUNT IS SECURE”.
STEP 9: Generate Recovery Code
Generate a recovery code in case you lose access to your MFA/2FA device for swiftest account recovery. Follow on-screen prompts to copy or download your recovery code.
Once you have copied down or stored the recovery code, click Continue.

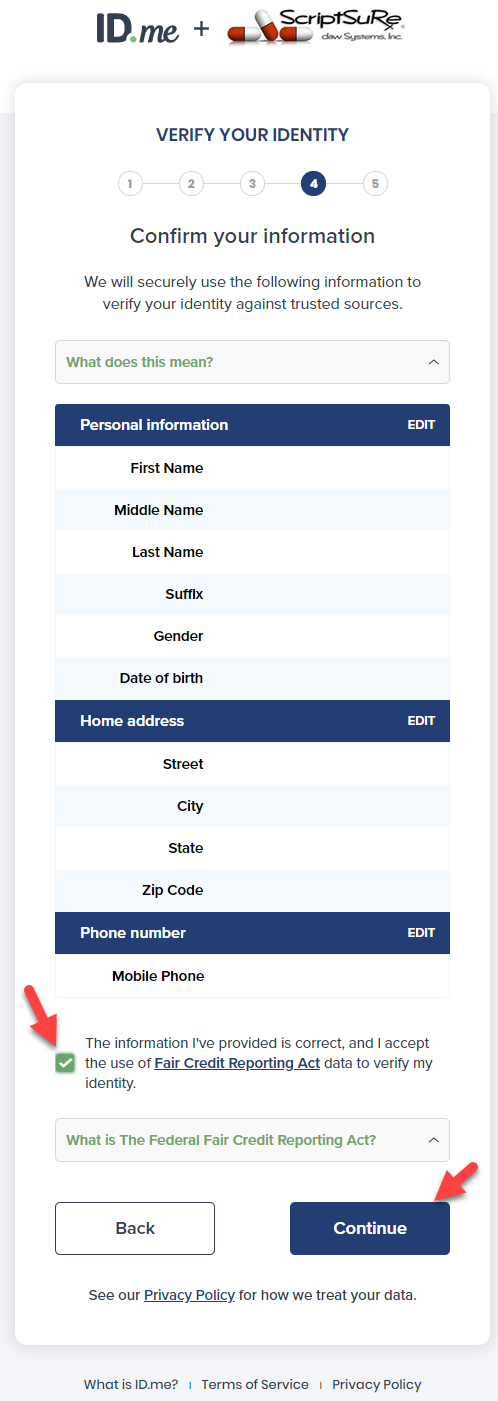
Step 10: Verify your Identity
Choose the method you prefer to verify your identity. You will be asked to prove that you are who you say you are by providing evidence such as uploading a photo ID upload or answering questions about your credit history. You will also be asked to enter your SSN. Information entered into ID.me’s workflow is encrypted while at rest and in-transit and completing the verification process will not hurt your credit score.
NOTE: If asked to enter a phone number, attempt to enter a phone number for a device that is in your possession and may be associated with you in financial records. This device does not have to be the same device utilized for MFA/2FA.


STEP 10: Successful Identity Verification
If verification is successful, follow on-screen prompts to continue to the next step of the workflow. Go to STEP 12 of this guide.
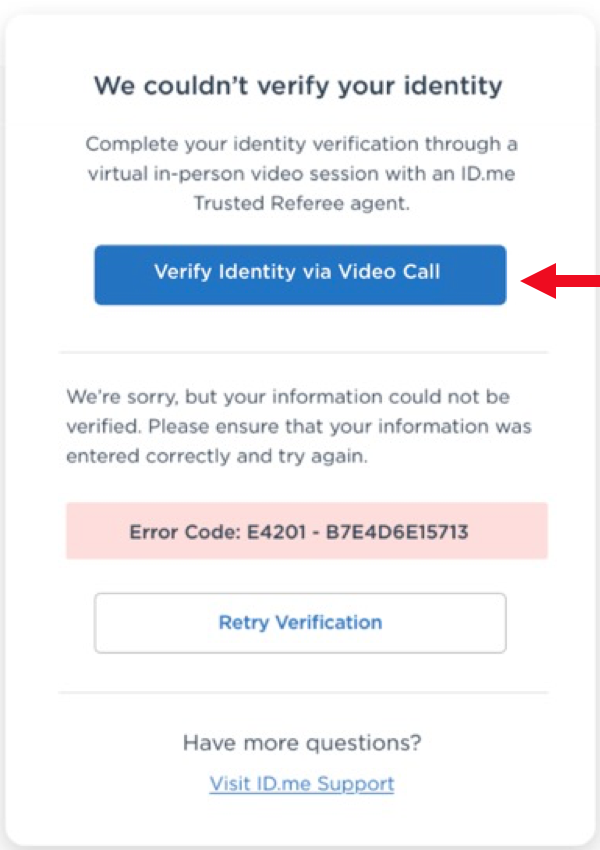
Step 11: Unsuccessful self-serve verification
 If ID.me is not able to verify your identity via self-serve workflow, a real person from ID.me’s team may need to assist in completing your verification. About 3-5% of providers who complete ID.me’s self-serve workflow need to talk with a real person on ID.me’s team to complete their identity verification. ID.me’s in-person service to complete identity verification is completed virtually, via video chat.
Not all who see an error code or RETRY button will be required to perform a video session to complete identity verification. Users are required to RETRY verification once before being presented the option to connect to an ID.me team member.
Retry
If ID.me is unable to verify your identity via self-serve workflow, you will see a RETRY button. Select RETRY to proceed. You may choose a different verification method than on your previous attempt or attempt the same method again. You must RETRY verification to continue.

If the retry is successful, follow on-screen prompts to proceed to the next step of the workflow.
If the retry is unsuccessful, you will be presented with the option to VERIFY IDENTITY VIA VIDEO CALL or to Retry Verification.
Verify via Video Call
Select VERIFY IDENTITY VIA VIDEO CALL to connect to a certified ID.me team member, called a Trusted Referee, to complete your verification.
Completing your Virtual In-Person identity verification should be simple and fast.
Once you are in the video call, it should only take a few minutes to verify your identity.
To Get Started, follow on-screen prompts to upload additional documents and take a Selfie.
After your documents and Selfie are uploaded, you will be connected to an ID.me team member to perform Virtual In-Person identity verification.
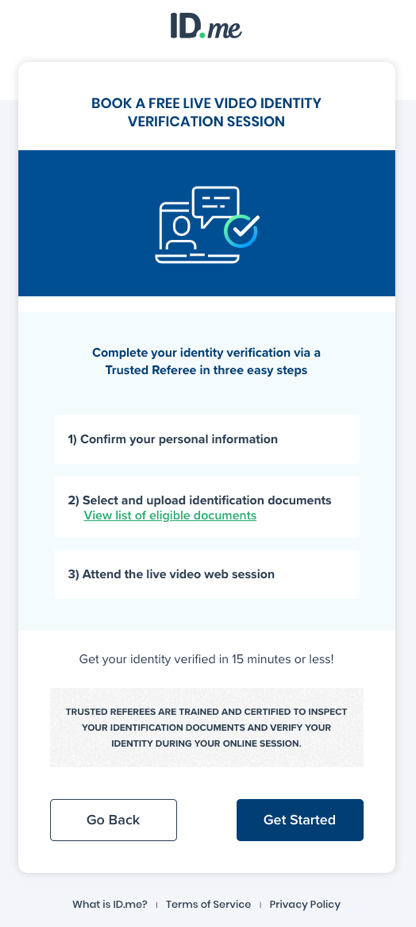
NOTE: The document upload and Selfie are required to proceed to the video session.
If you don’t have the documents needed on-hand, use the SAVE SESSION AND EXIT button at the bottom of the screen to save your spot in the workflow. You will be sent an email with a link to click in order to return to the same spot in the workflow (with the documents and/or selfie you have uploaded saved).

Documents ready? Click the link included in your Save Session and Exit email to return to the same spot and continue the workflow.

STEP 12: Complete ID.me’s workflow
Complete ID.me’s workflow by selecting ALLOW, authorizing ScriptSure to receive your verified identity information.

Step 13: You will now be navigated back to the ScriptSure program windows where you can complete any remaining next steps
A Business Associate Agreement (BAA) must be signed. Click start to review and sign the Agreement.

Step 13-(1): Enter signer and practice info and Click SIGN BAA and Confirm signing.

Step 14: You will now be navigated back to the ScriptSure program windows where you can complete any remaining next steps
You can approve any providers and users that need to prescribe controlled substances in the application.

STEP 15: You can now login to ScriptSure at www.scriptsure.com using your username (your email address) and the password you set.
Troubleshooting:
Questions about Identity Verification?
See ID.me’s frequently asked questions (FAQ) pages for quick tips on Verifying My Identity for Healthcare and Securing my EPCS or eRx Account with Multi-factor Authentication (MFA)
Questions or Issues during Setup?
For help with any issues during setup, contact support@dawsystems.com or call 866-755-1500 x2
Was this article helpful?
That’s Great!
Thank you for your feedback
Sorry! We couldn't be helpful
Thank you for your feedback
Feedback sent
We appreciate your effort and will try to fix the article