Prescription Preview Options
TABLE OF CONTENTS
Navigate to "Prescription Preview"
5. Current Supervisor (Optional)
15. Note To Pharmacist (Pharmacy Note)
16. Patient Insurance (Optional)
20. Queue to Provider for Approval
return to top
Navigate to "Prescription Preview"
1. Login to ScriptSure: www.scriptsure.com.
2. Search for and select the patient.
3. Click “PRESCRIBE NEW DRUG”
4. Search for and select the medication.
5. Select the strength and format
1. Warning
- If the medication selected flags any interaction(s) for the patient, this warning box will be displayed. To read the interaction, click the Warning box.

- A box will pop up with information about the interaction(s).

2. Settings
- Click the icon below to show coupon or formulary/alternatives.

- Check the boxes to display coupon and/or formulary/alternatives.

- Any Coupon and Formulary information will be displayed at the bottom of the page.

- To view the coupon, click "Download".
- To print the coupon, click "Print".

3. Current Practice
- Ensure the correct practice is selected under "Current Practice". To change it, click on the practice name, and it will allow you to select a different practice.
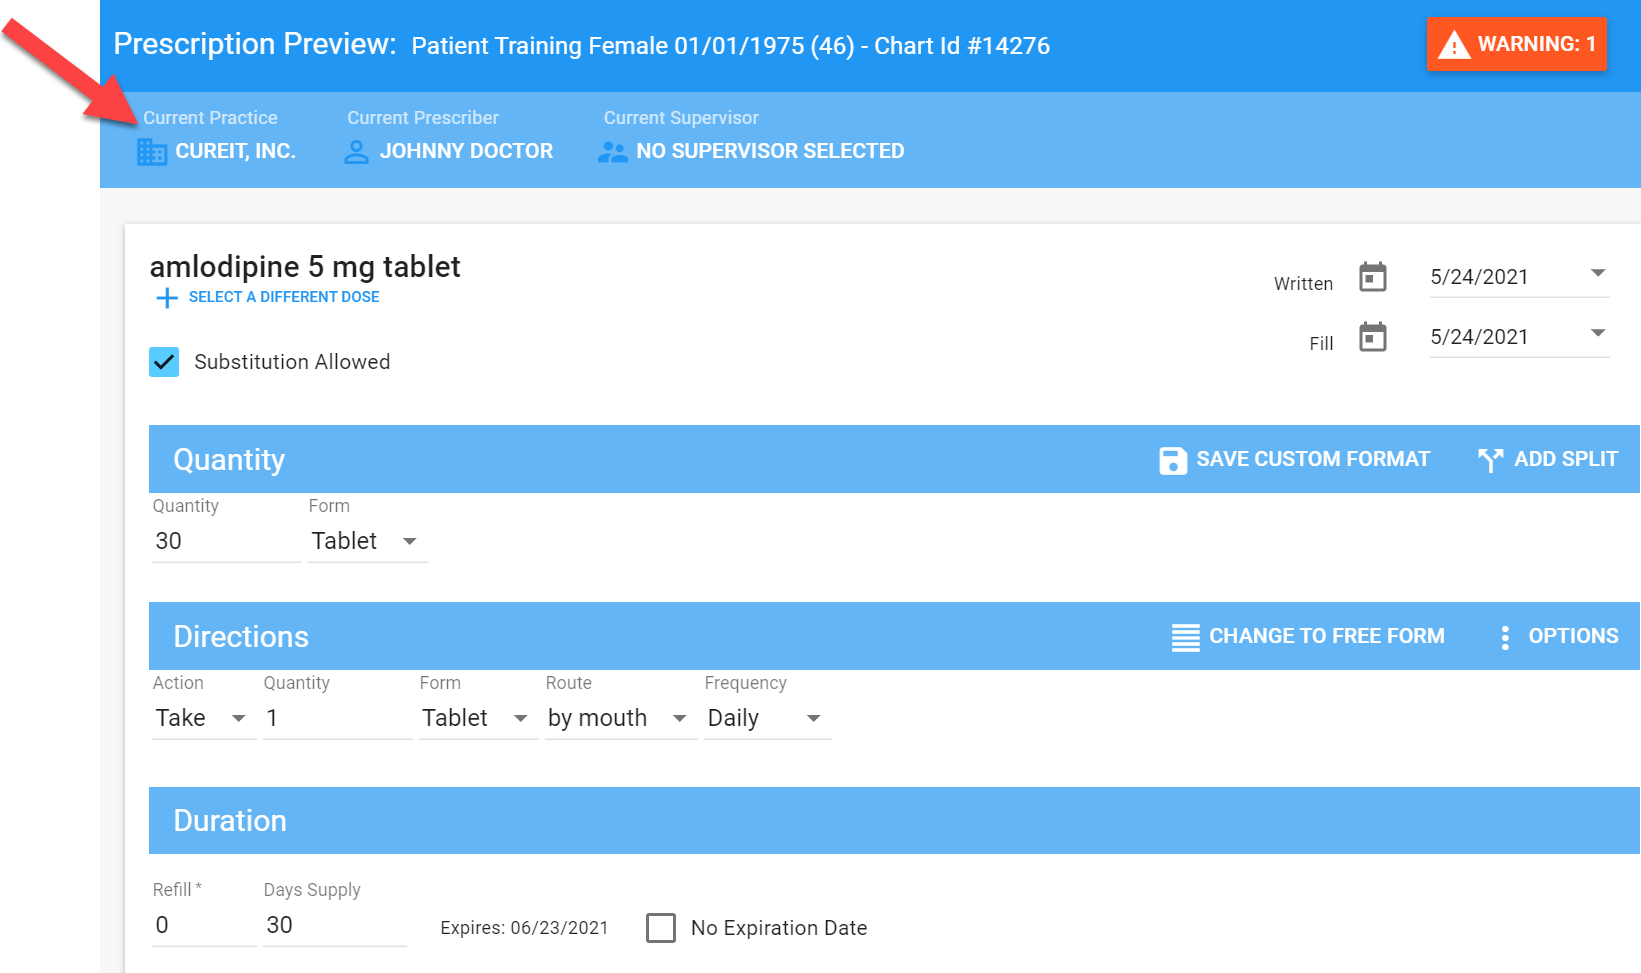
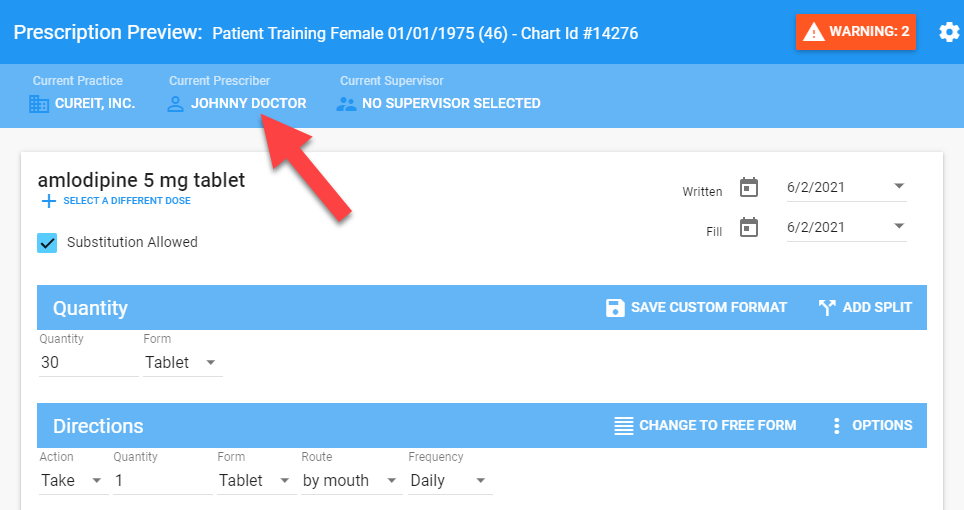
4. Current Prescriber
- Ensure the correct prescriber is selected under "Current Prescriber". To change it, click on the prescriber's name, and it will allow you to select a different one.
5. Current Supervisor (Optional)
- You can select a supervisor to be included on the script. To select one, click the supervisor's name, and it will allow you to choose from a list of supervisors.

6. Save Only
- If you would like to add a prescription to the patient's list without sending the script to the pharmacy, choose "SAVE ONLY".
- Create the prescription. (Click here for more details.)
- Then, click "SAVE ONLY".
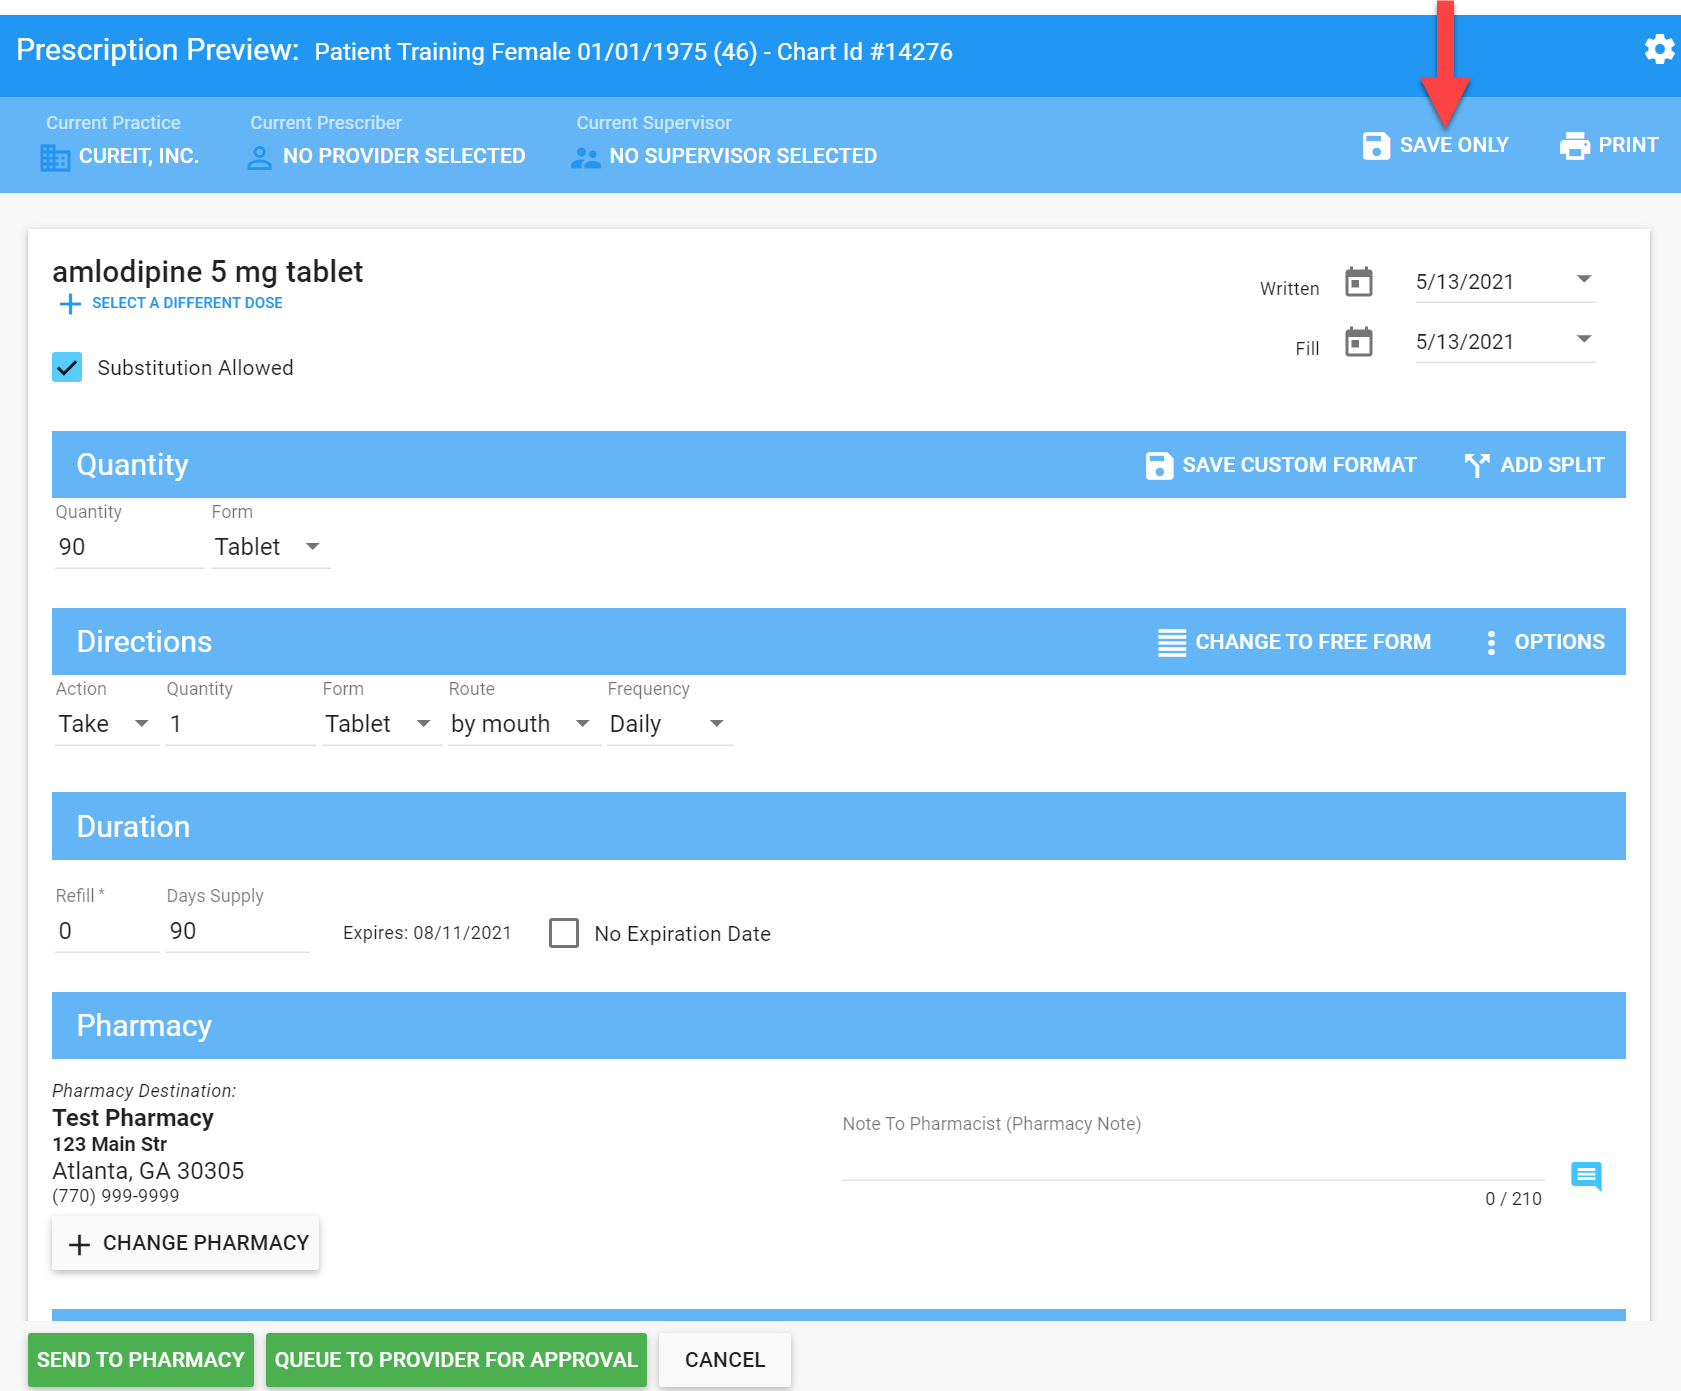
- The medication will then show up on the patient's medication list with "No Pharmacy- Save Only" listed under the "PHARMACY" column.


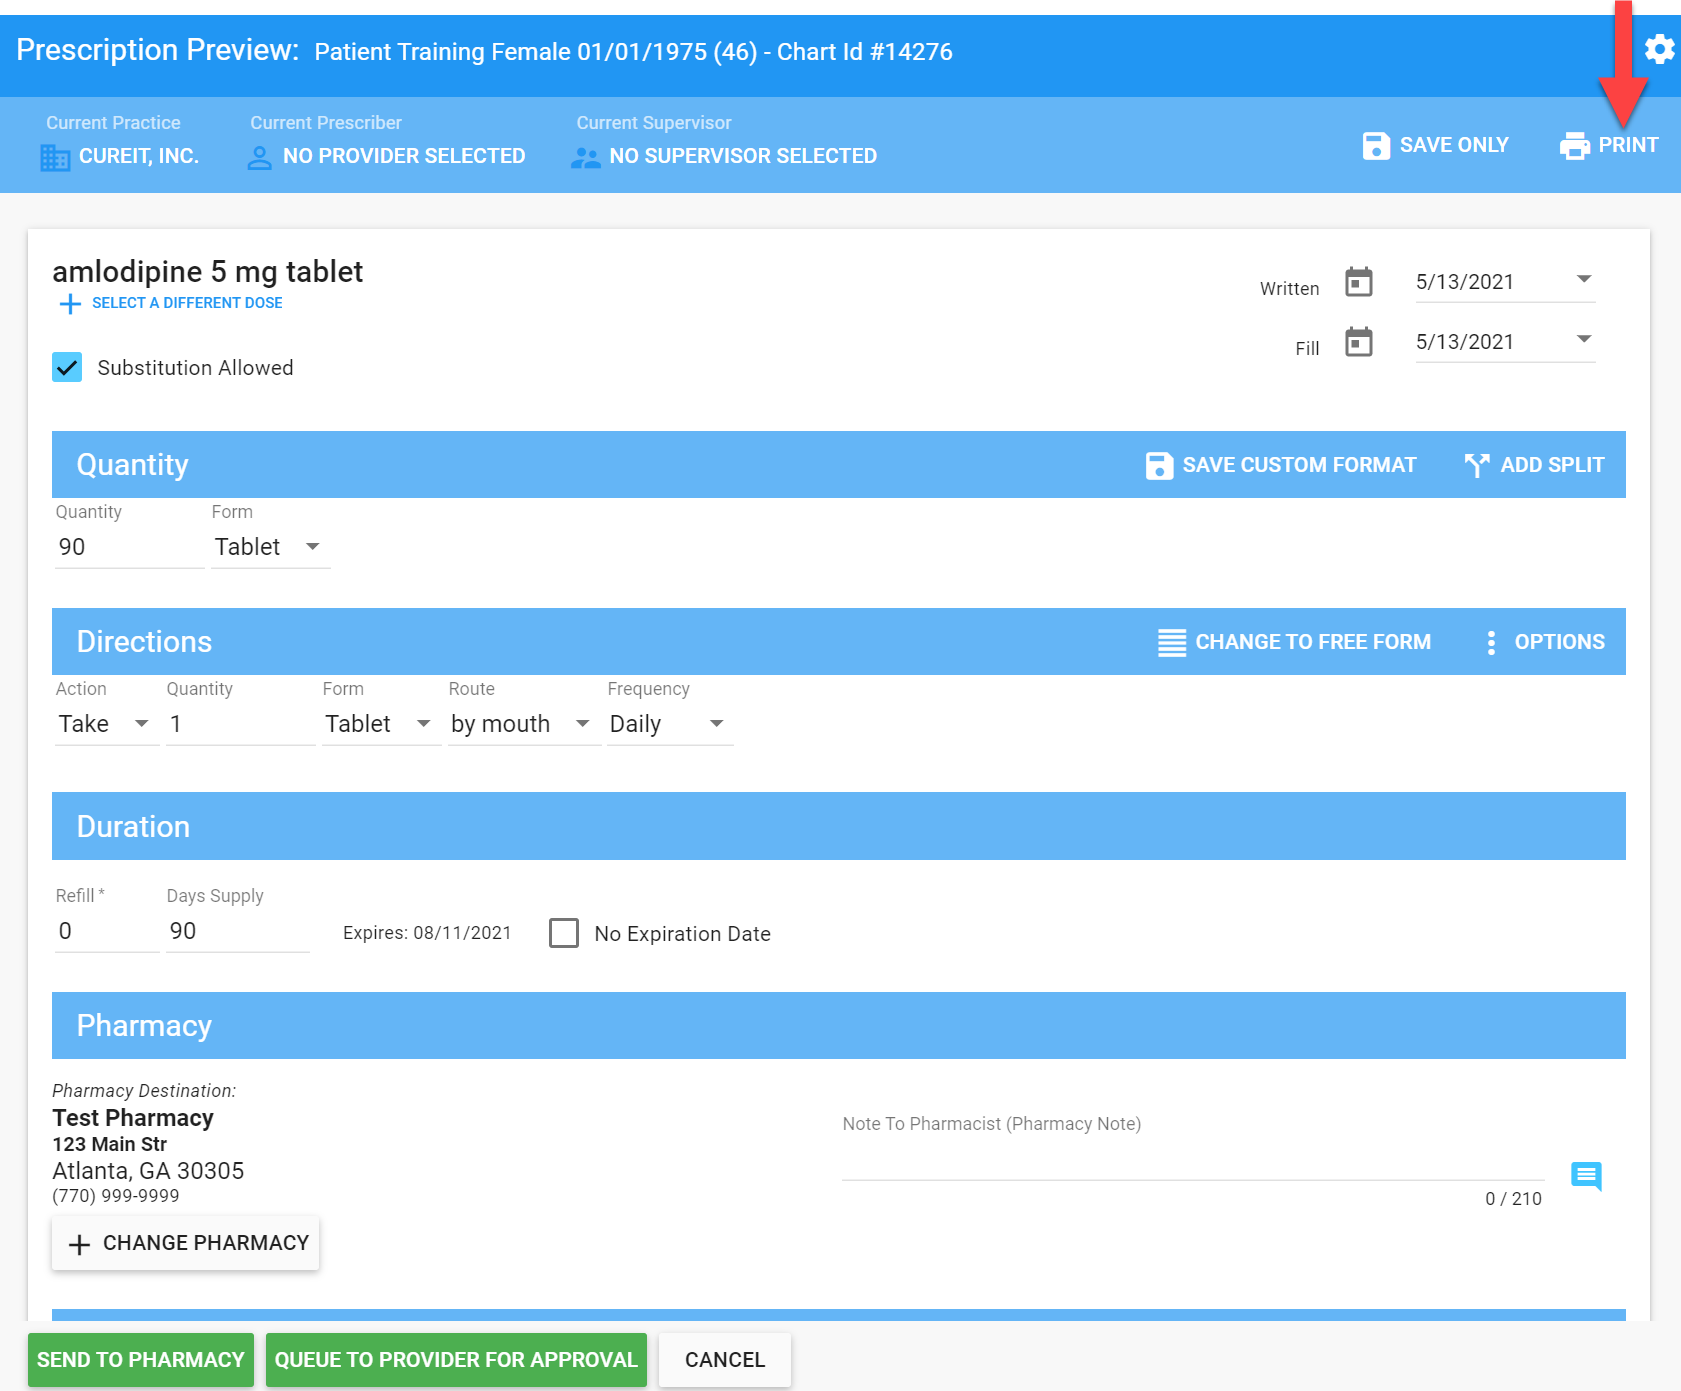
7. Print
- Create the prescription. (Click here for more details.)
- Then, click "PRINT".
- Select your printer settings and click "Print".
8. Select a Different Dose
- If you need to change the strength of the medication, click "Select a Different Dose" and select the correct strength.

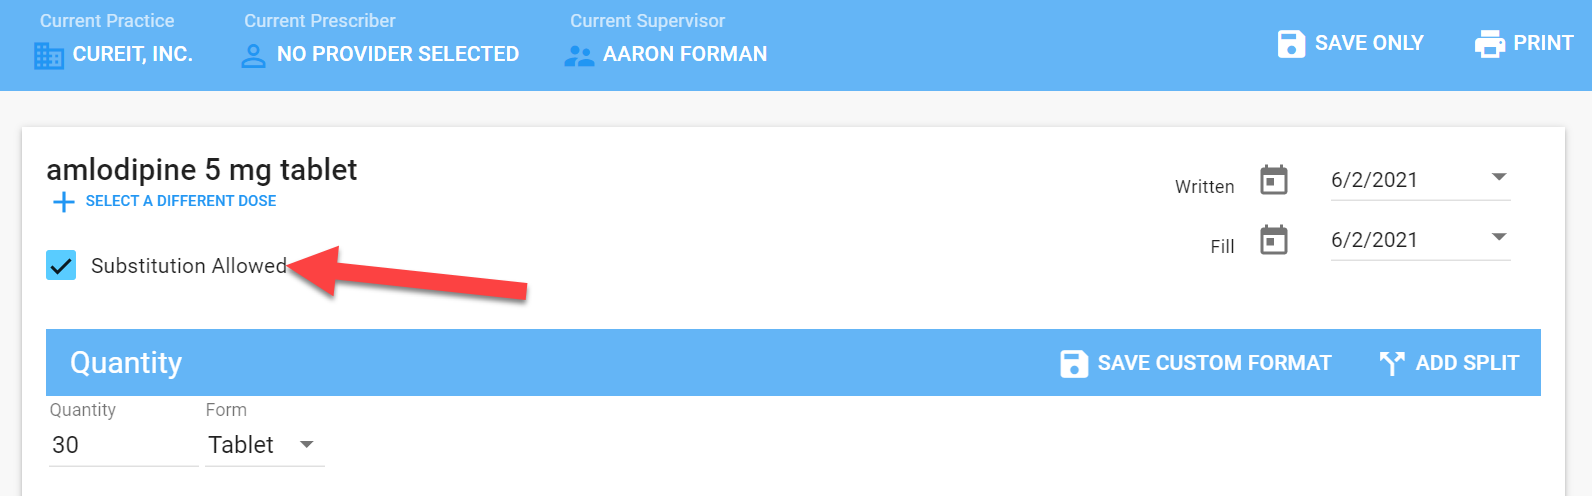
9. Substitution Allowed
- This box will always be checked as a default. However, you can uncheck it if you want the pharmacy to dispense as written and not substitute for a generic.
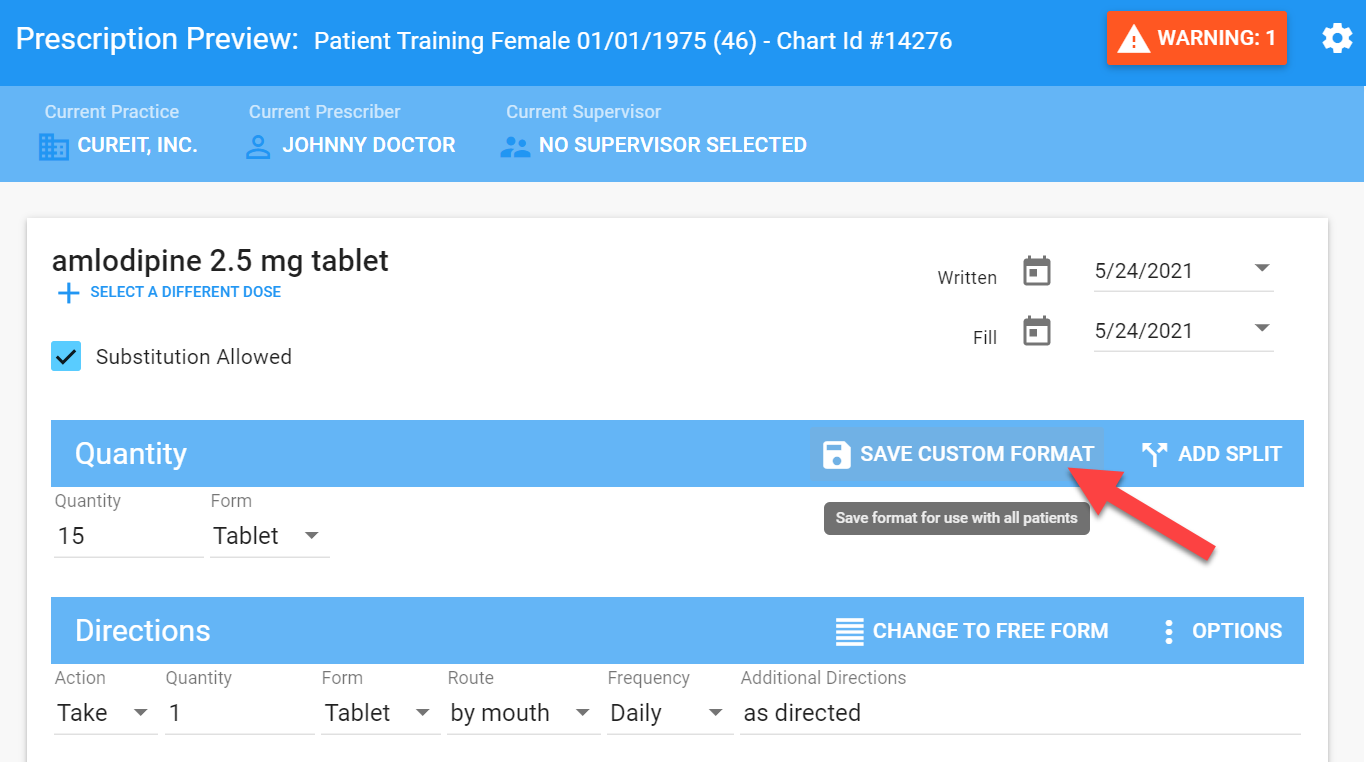
10. Save Custom Format
- If you would like to save the format as a custom format, edit the quantity and directions as needed and then click "Save Custom Format".
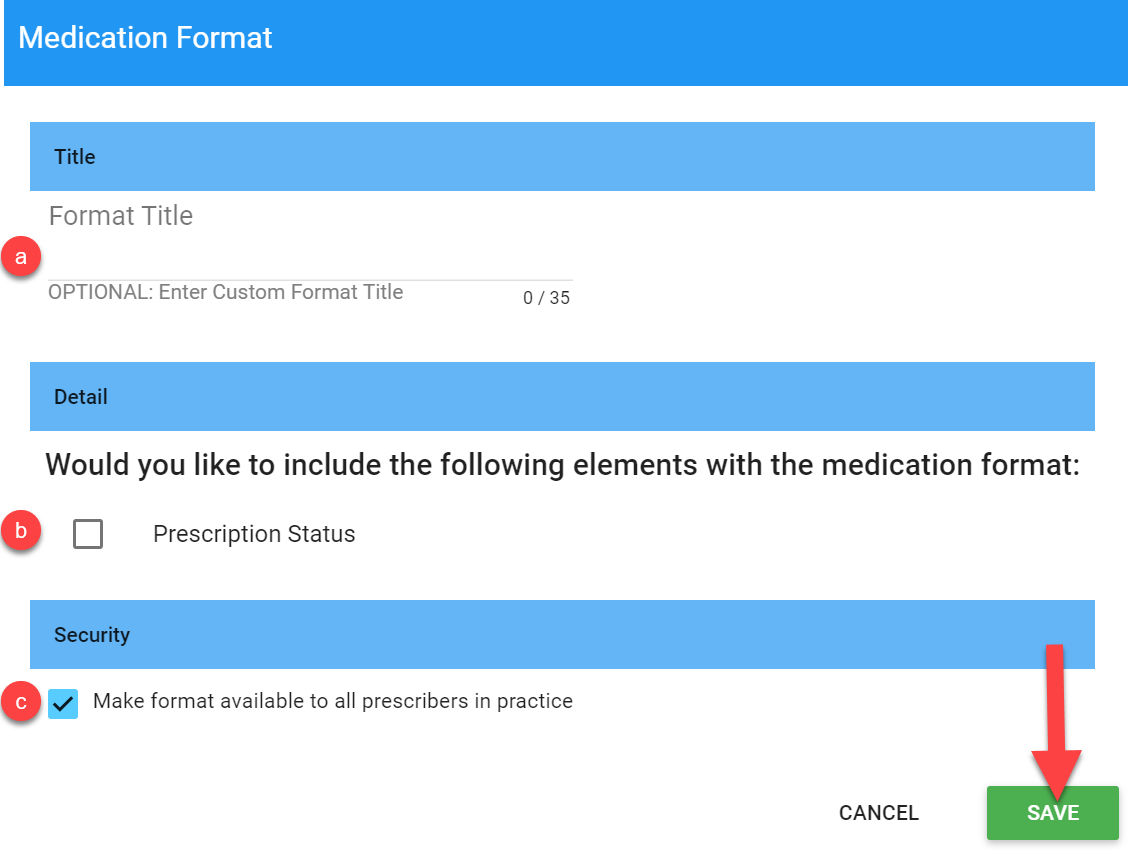
Complete the following as needed and click "Save".
a. Title (Optional): Enter a title here to name the format.
b. Detail (Optional): Check the "Prescription Status" box if you would like to include the Prescription Status with the format.
c. Security (Optional): Check here if you would like for the custom format to be accessible to all prescribers in the practice.
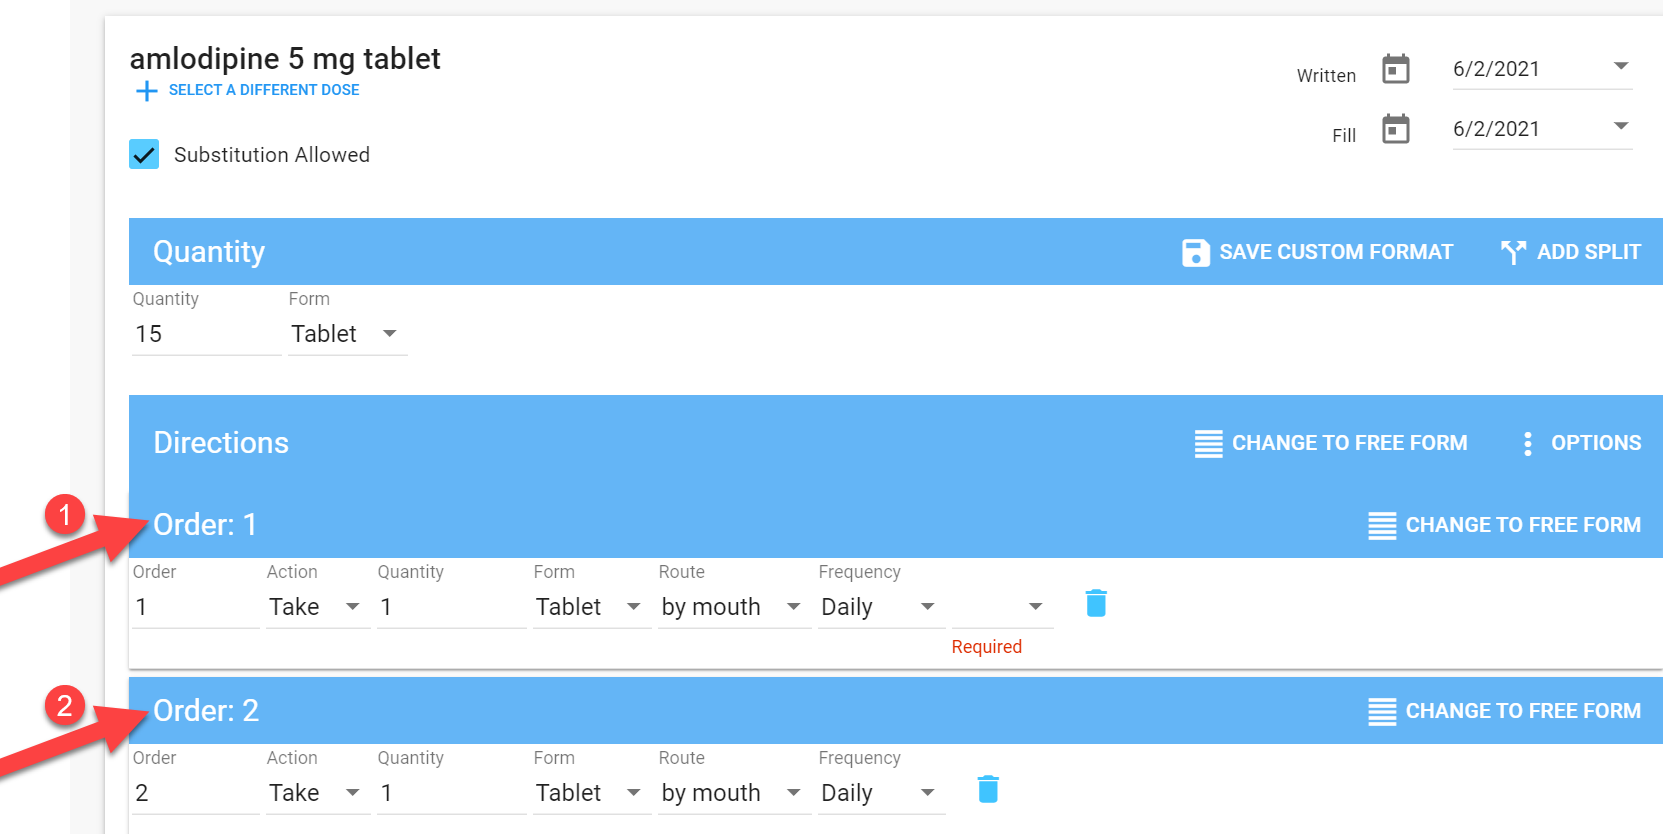
11. Add Split
- Click "Add Split" if you would like to add more rows of prescriptions.

- Once you click "Add Split", there will be new rows added like "Prescription 1", "Prescription 2" , and "Prescription 3" in the screenshot below.

- You can click the clock icon to select how often you would like the medication to be filled. This will automatically update the "Fill Date" on the prescription rows.


- For each new prescription row, you can set the following:
a. Fill Date
b. Pharmacy
c. Quantity
d. Form
e. Refill
f. Day Supply
g. No Expiration Date (Optional)

- To delete a prescription row, click the trashcan icon.

12. Change to Free Form
- To remove the structured directions line, click "Change to Free Form".

- This will change the Directions line to a free form field where you can type the directions.
13. OPTIONS
- Click "Options" to see additional fields for the directions.

- Add Direction: Click here to add more lines of directions.
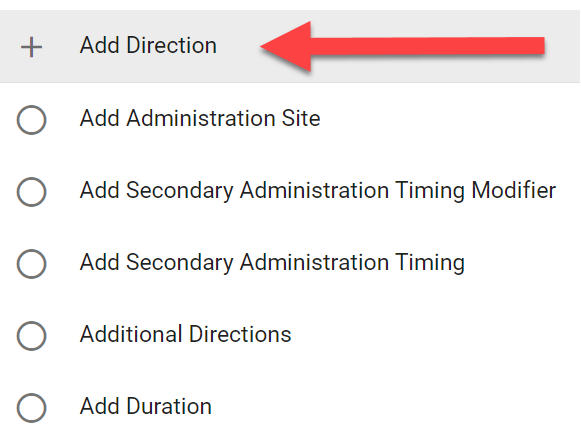
- This will add numbered rows for more directions.
For each new prescription row, you can select separate directions.
A new required field will be displayed for you to select one of the following options: "Then", "And", "Or".

- To delete a row, click the trashcan icon.

- Under "Options", you can also add new fields to the directions line, like "Additional Directions".

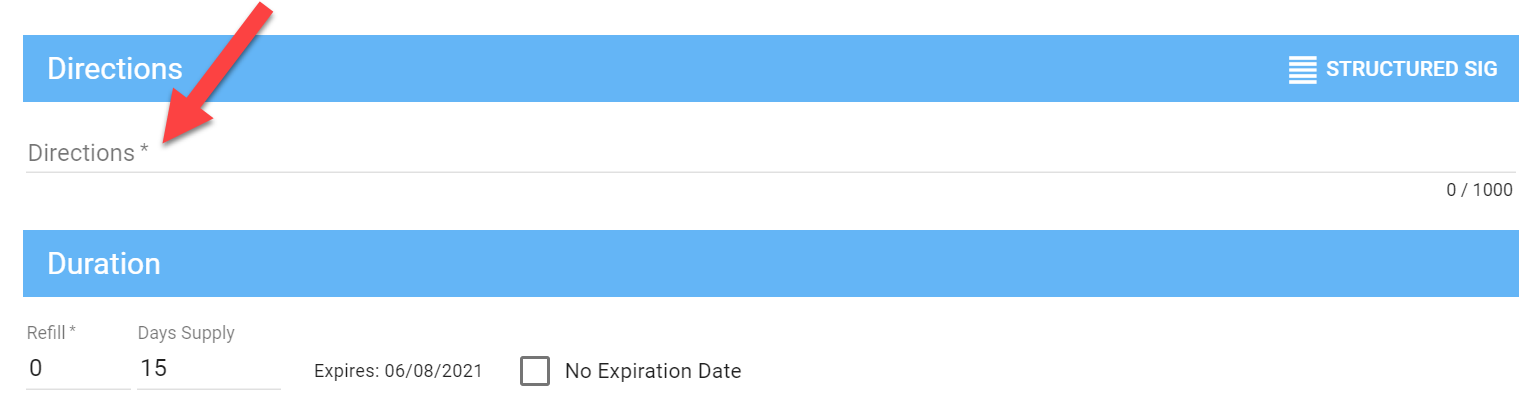
14. No Expiration Date
- If the patient will be on the medication ongoing, you can check this box. If you check the box, the system will always consider this medication when checking for drug interactions.

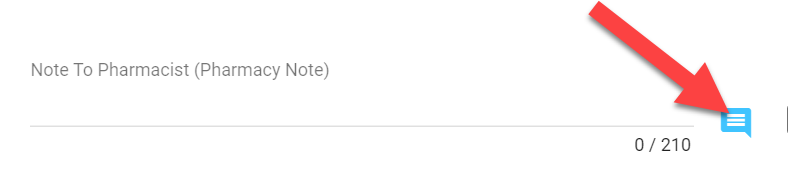
15. Note To Pharmacist (Pharmacy Note)
- Use this field to relay additional notes to the pharmacy, such as "Please dispense with easy open lids".
IMPORTANT NOTE: This field should NOT be used to enter insurance, diagnosis, patient demographics, or prescription instructions.
- You can type in the free form field to add your note or you can create a custom comment that can easily be selected for future scripts as well.
- To create a custom comment for future use, complete the following steps.
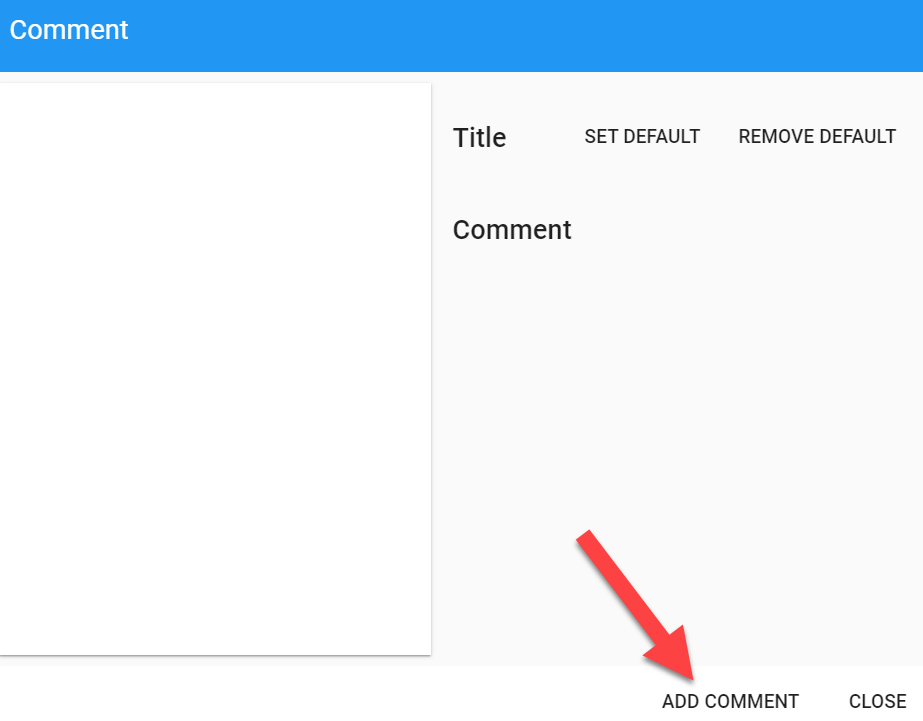
- Click the icon below.
- Then, click "Add New Comment"
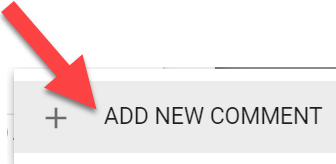
- Click "Add Comment"
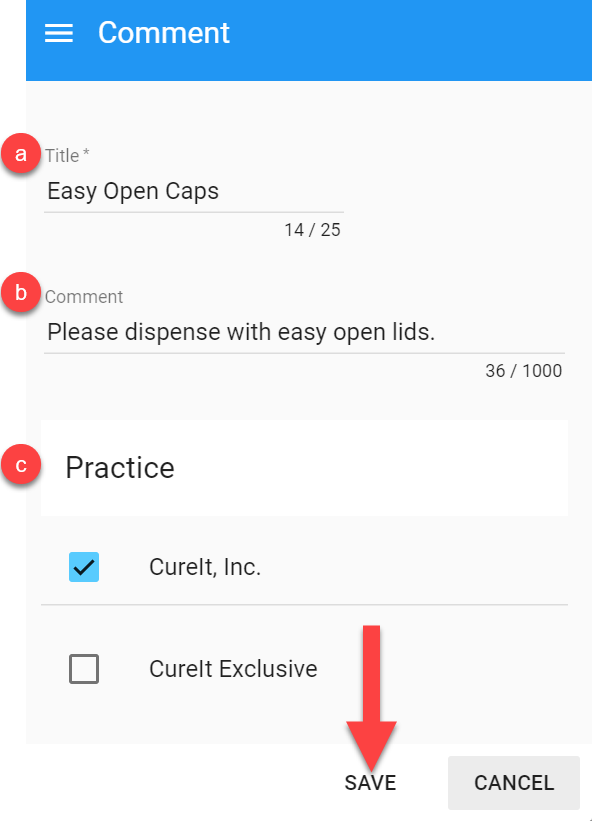
- Select the following information and click "Save".
a. Title: Give the comment a title.
b. Comment: Create the comment to be sent to the pharmacy.
c. Practice: Select all practices that will need this custom pharmacy comment.
- Once you have created and saved a custom format, you will be able to easily select it by following the steps below.
- Click the icon below.

- Select the applicable comment. (It will show all titles that have been created.)

- Once you click the comment title, it will add the note to your script.

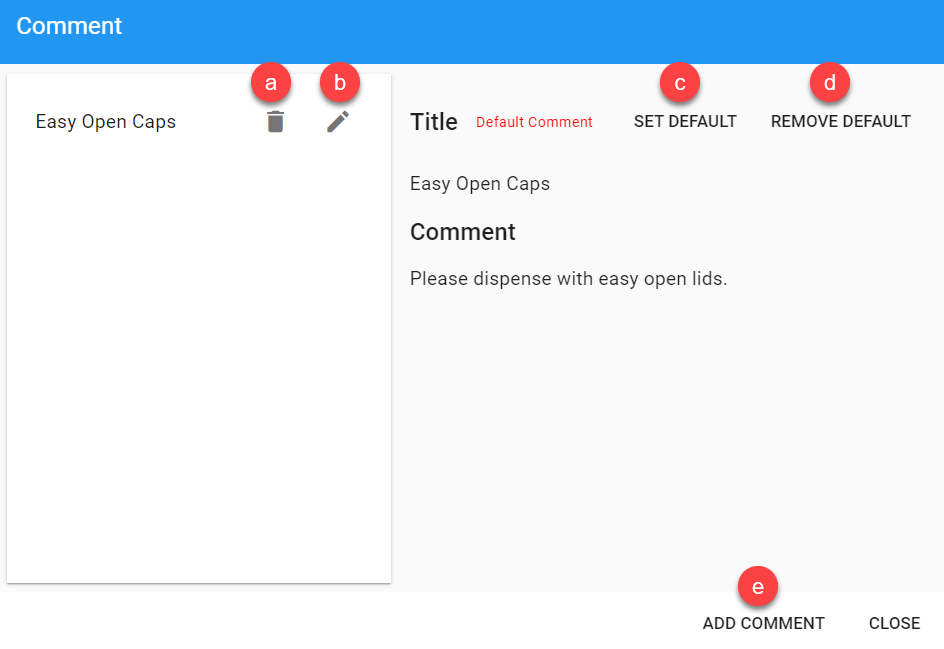
Additional Options:
a. Trash can: Click the trash can to delete a custom comment.
b. Edit: Click the pencil to edit an existing custom comment.
c. Set Default: If you would like to set a comment as a default, make sure it is selected on the left side of the page, and then click "SET DEFAULT".
d. Remove Default: To remove a default comment, click "Remove Default".
e. Add Comment: Click here to add a new custom comment.
16. Patient Insurance (Optional)
- This is a section where you can specify insurance information, such as coupon or hospice billing information. (For more details, click here.)
17. Diagnosis
- If you would like to add a diagnosis to the script, you can select "+ ADD DIAGNOSIS".

- This will bring up a search window. Search for the diagnosis and click the green plus sign.
a. Find a Problem: You can search by the diagnosis name or by ICD-10/ICD-9/SNOWMED codes.
b. Common: Click here to view common diagnoses.
c. Search Options: The default is set to show ICD-10 codes, but you can change it to one of the different options if preferred.

- The diagnosis will now be added to the prescription.

18. More Options
19. Send to Pharmacy
- When you are ready to send the script to the pharmacy, click "Send to Pharmacy".
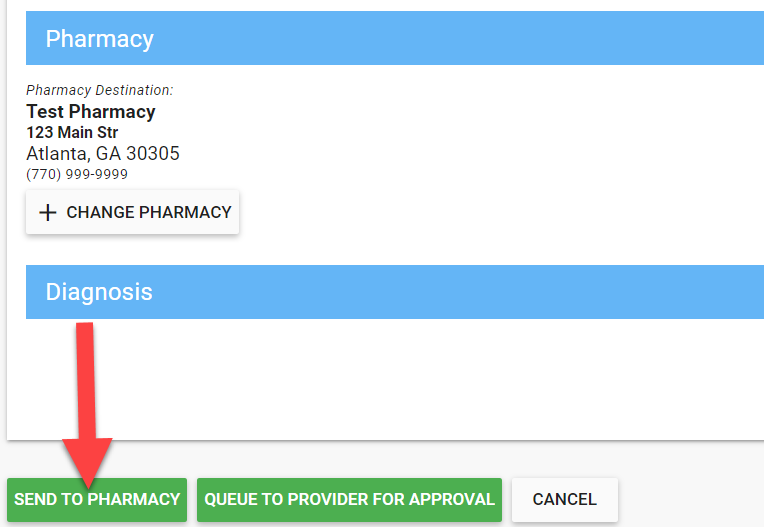
- Make one final review of the prescription details. If everything looks correct, click "Approve and Send".

- The prescription will then be sent to the pharmacy and will show up on the patient's list of medications.

20. Queue to Provider for Approval
- The script will not be sent to the pharmacy until it is approved. (Notification settings can be customized for each user: Providers can receive text messages and/or emails when new prescriptions are added to their queue.)
- All controlled medications must be approved by a provider. However, non-controlled scripts can also be queued. Note: If preferred, prescribers can require provider approval for both non-controlled and controlled medications. For instructions, click here.
Non-controlled Medications:
Supporting User View:
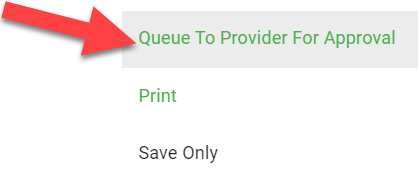
- First, choose "Queue to Provider for Approval".

- If a supporting user queues a non-controlled medication, the script will show up on the patient's chart like the example below. Since the medication was not a controlled substance, the supporting user can still go in and approve, deny, or edit the script by selecting the options below.

Controlled Medications:
Supporting User View:
- When a supporting user creates a script for a controlled medication, the user should choose the "Send" option in the right bottom-hand corner.

- When this box pops up, choose "Queue to Provider for Approval".
- The script will then be added to the patient's chart with this note: "Controlled Substance Sent to Provider for Approval".

Provider's View:
- When the provider logs in, the script will be displayed in their Prescription Queue.
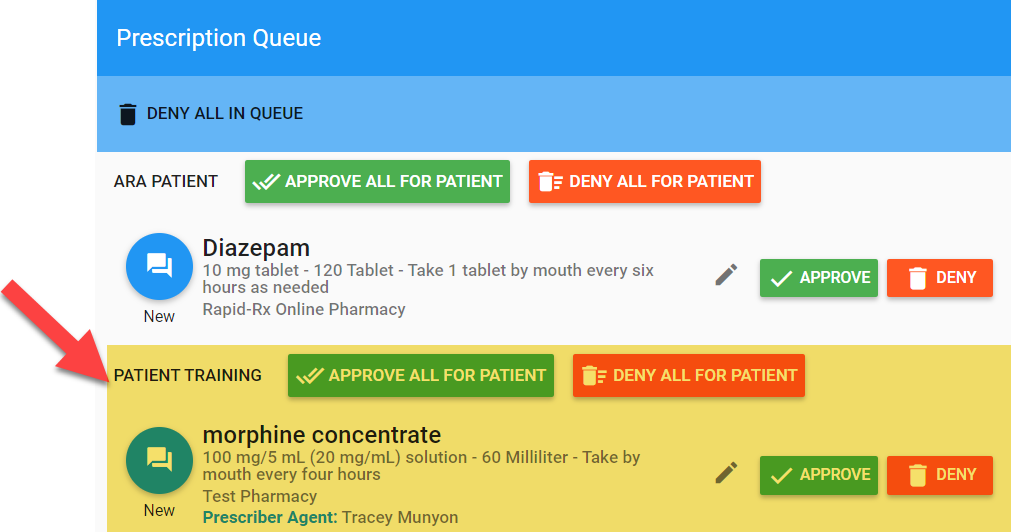
- The prescriber can edit, approve, or deny the script by selecting the options below.

Edit:
- If the prescriber selects the edit option, the Prescription Preview window will pop up where they can make changes before sending it to the pharmacy.

Approve:
- When the provider clicks "Approve", an ID.me box will pop up. The prescriber will need to login and approve the controlled prescription with the Authenticator App, Code Generator, or a physician token to meet the 2-factor authentication requirement.

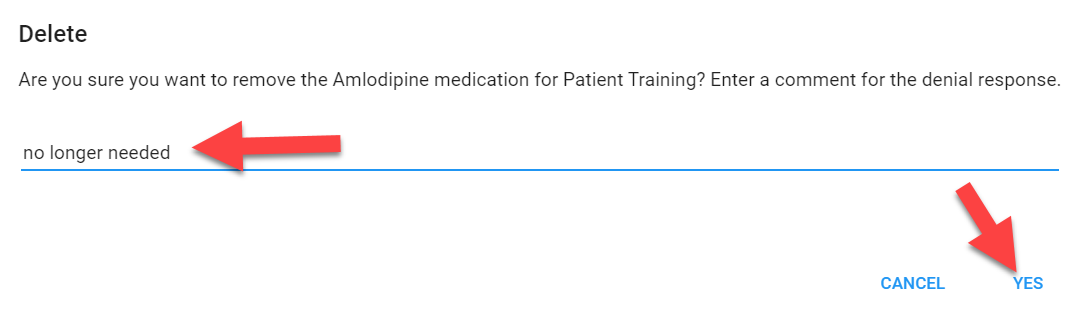
Deny:
- When you click "Deny", the following box will pop up.
- Enter a comment for the denial and then click "Yes". This will delete the script from the patient's chart, and it will NOT be sent to the pharmacy.
Was this article helpful?
That’s Great!
Thank you for your feedback
Sorry! We couldn't be helpful
Thank you for your feedback
Feedback sent
We appreciate your effort and will try to fix the article