return to top
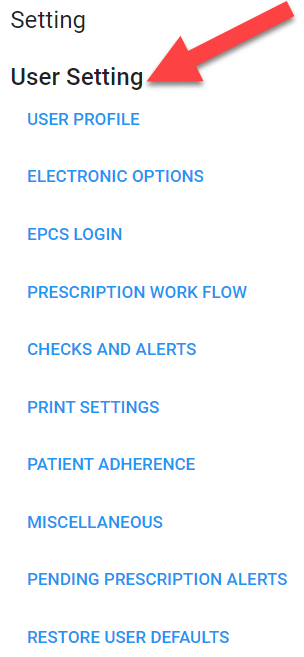
TABLE OF CONTENTS
- User Profile
- Electronic Options
- EPCS Login
- Prescription Work Flow
- Checks and Alerts
- Print Settings
- Patient Adherence
- Miscellaneous
- Pending Prescription Alerts
- Restore User Defaults
Navigate to User Settings
- Login to ScriptSure: www.scriptsure.com.
- Click your name in the top righthand corner.

- Select "Settings"

- Navigate to User Settings
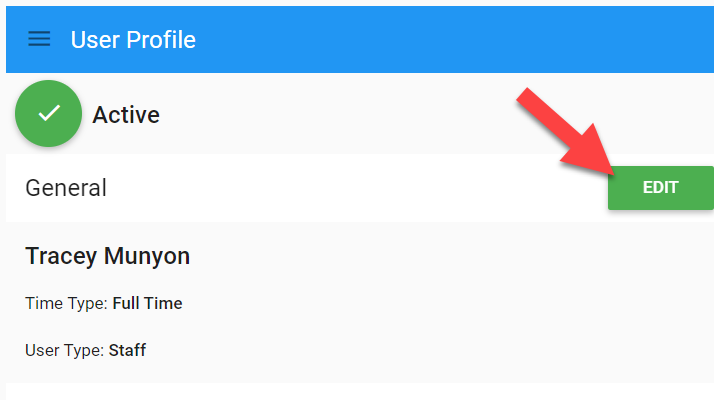
User Profile
- You can edit your profile here by selecting "Edit". (Click here for more details.)
Electronic Options

Eligibility: Patient Eligibility Requests
- Slide the marker to the right if you would like to access patient insurance eligibility.
Formulary: Formulary Search
- Slide the marker to the right to enable formulary search. The formulary search will include formulary levels for medications like the example below.

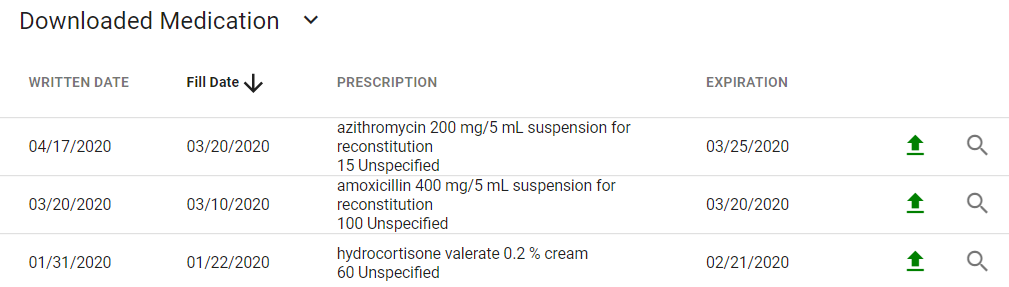
Drug History:
- Download Drug History: Slide the marker to the right to download drug history like the example below. Downloaded medications are pulled from scripts that have been billed to the patient's insurance. (This option is not available to all plans.)
- Show Drug History Confirmation: Slide the marker to the right to display history confirmation. When enabled, a history confirmation box (like the example below) will pop up each time you select a new patient; it will include a summary of the patient's insurance status.

EPCS Login
- If you need to disable your ID.me verification within ScriptSure, you can do so by sliding the marker below to the left. One possible scenario for this could be if your cell phone has been stolen, and you need to prevent anyone from being able to approve scripts with your phone.

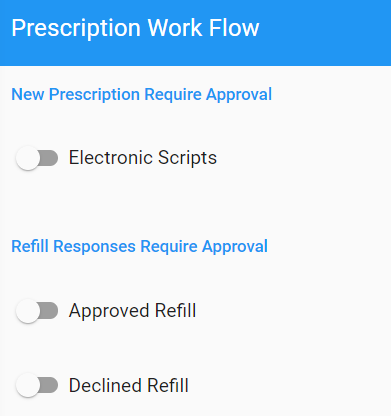
Prescription Work Flow
Providers can edit their Prescription Work Flow settings to require provider approval for all new prescriptions and/or refills.
- New Prescriptions Require Approval
- Electronic Scripts: Slide this marker to the right to require provider approval for all electronic scripts, including both controlled and non-controlled medications.
- Refill Responses Require Approval:
- Approved Refill: Slide this marker to the right to require provider approval for all refill approvals.
- Declined Refill: Slide this marker to the right to limit all refill denials to the provider only.
Checks and Alerts
To turn on an alert, slide the marker to the right until it turns red. (For more details, click here.)

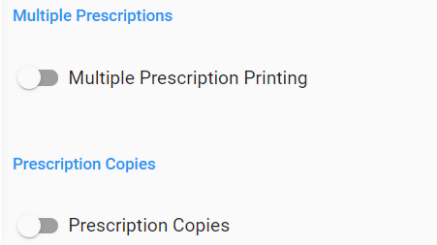
Print Settings
- Slide the marker to the right to disable the printing setting.

- Slide the markers to the right to enable the printing settings for "Multiple Prescriptions" and "Prescription Copies". If you enable "Prescription Copies", you will be prompted to print a copy of the prescription each time you complete an order. You can choose to print copies for all electronic scripts and/or all printed scripts.
Patient Adherence
- Slide the marker to the right to disable discount cards from printing.

Miscellaneous
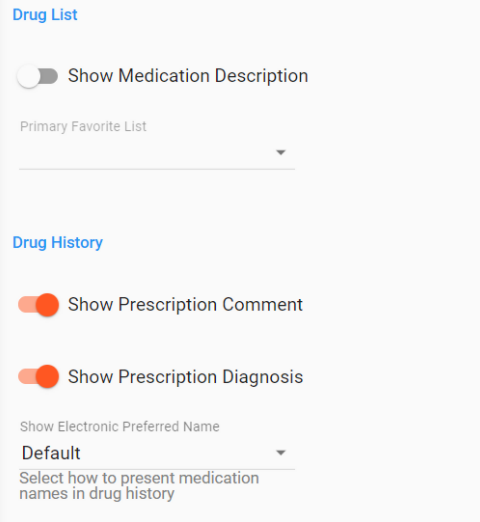 | Drug List Show Medication Description: To include the drug description (like the example below) slide the marker to the right.  Drug History Drug History
 |
 | Encounter Summary Clear Patient after Summary: When this option is enabled, the screen will automatically move back to the home screen after viewing the patient's summary. Current Medications Include Download Current in Practice List: This option can be used with vendors to import current medications from the vendor's system into ScriptSure. |
 | In-House Pharmacy User Fills In-House Pharmacy Prescriptions: Slide this marker to the right if you use an in-house pharmacy. (For more details, click here.) Collect Vitals During Prescription Writing Do Not Collect Vitals During Prescription Writing: If you want to require vitals to be recorded when writing each script, slide this marker to the right. |
Pending Prescription Alerts
The steps below detail how a provider can disable text and/or email alerts. A provider is anyone with a DEA/NPI number and authorized to send prescriptions in ScriptSure.
Go the Settings>User Settings>Pending Prescription Alerts to set the appropriate options.
SETTINGS AND HOW TO DISABLE ALERTS FOR A USER
1. When the Settings Window opens, click Pending Prescription Alerts under the User Settings:

2. In the Screenshot below, set the other options to disable SMS text messages and/or Email Messages based on your preferences.
Note: When alerts are turned on at the practice level it means each Provider will have the option of receiving an SMS text and/or email alert.
Example: If only SMS text messages are turned on by the administrator, then the Providers will ONLY be able to receive SMS text alerts.
3. View and edit the appropriate options as desired:
- Alert Sending Disabled: This allows for a user to deactivate the sending of alerts (slide right).
- Disable SMS Text Messages: Disabling this setting (slide right) stops the application from sending SMS text alerts to a provider’s cell phone.
- Disable Email Messages: Disabling this setting (slide right) stops the application from sending email alerts to the provider's email address.
- Do Not Disturb: Allows a user to set a do not disturb Start and End time period. During the do not disturb period, the Provider will not receive SMS text or email messages regarding the pending prescription alerts.
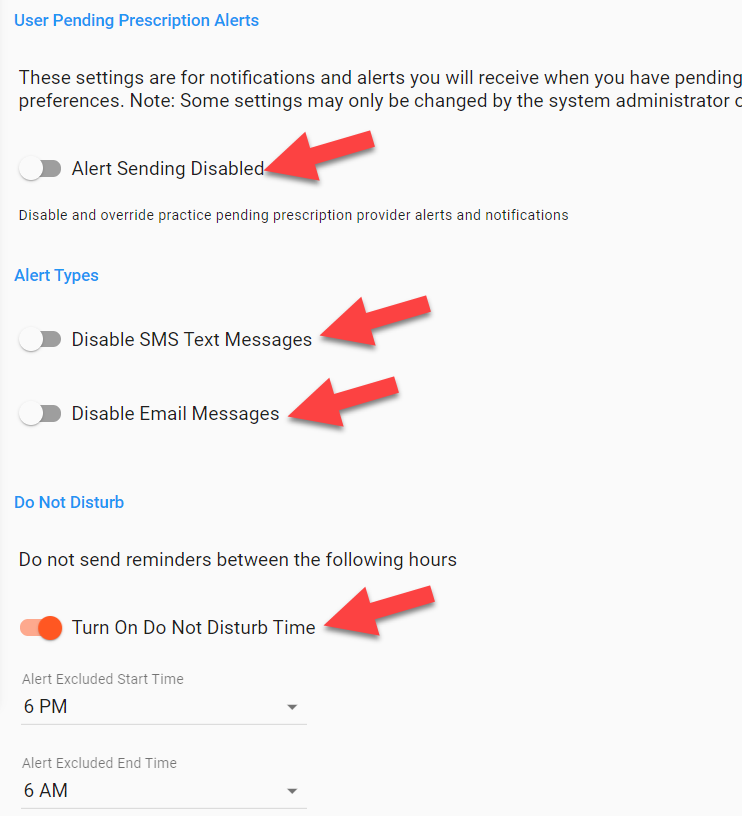
4. Click Save and then Close in the bottom left to store the changes:

Restore User Defaults
- Only click this option if you would like to reset your user settings to the default settings.
Was this article helpful?
That’s Great!
Thank you for your feedback
Sorry! We couldn't be helpful
Thank you for your feedback
Feedback sent
We appreciate your effort and will try to fix the article